The printer control panel or computer screen may display one of the following errors or messages, and printing may not proceed as expected:
Incompatible Printhead
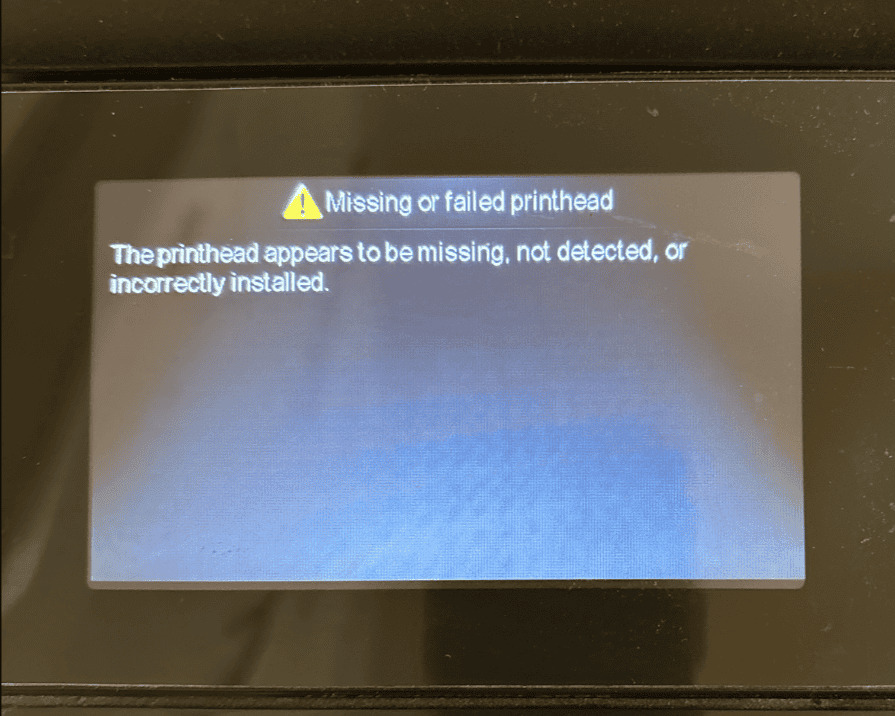
Missing or Failed Printhead
Printhead Appears to be Missing or Damaged
Printhead Failure
Printhead is Missing, Not Detected, or Not Properly Installed
Printhead Missing
Printhead Missing or Damaged
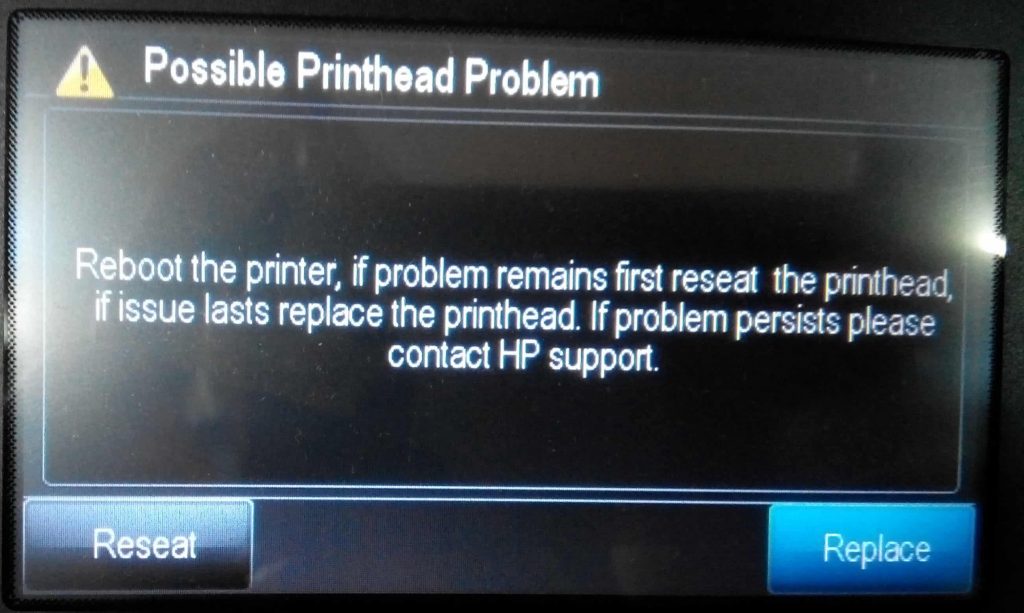
Printhead Problem
Follow this step-by-step guide to resolve the problem and resume printing:
NOTE
Please Check Cartridge Compatibility:
Confirm the new cartridge is compatible with your printer model. Using an incompatible cartridge can lead to errors. Double-check the cartridge model number against the printer’s specifications.
Figure out what type of cartridge you have to troubleshoot these errors (please click to expand the text) :
Fix errors like Incompatible printhead, Missing or failed printhead, and Printhead problems for printers using cartridges:
364, 564, 902, 903, 910, 912, 920, 934 and 935 cartridges
Follow these steps in the given order. Test the printer after each step to check if the problem is fixed.
Part 1. Resetting the Printer
Reset the printer to fix any printer-related issues.
If your printer has a rechargeable battery, take it out.
- Press the power button to switch off the printer. If it doesn’t turn off, disconnect the power cord from the printer.
- Unplug the power cord from the power source.
- Wait for 60 seconds.
- Plug the power cord directly into a wall outlet and connect it to the printer.
- Switch on the printer to finish the reset process.
Part 2. Cleaning the Printhead
If your printer’s printhead is removable, you can clean it manually. Otherwise, follow these steps to replace the printhead.
- Open the door or lid to access the cartridges. Wait until the carriage stops moving before proceeding.
- Check if there’s a latch on the carriage.
- If the printhead does not latch, it cannot be replaced.
- If there’s a latch, continue to the next step.
- Remove all cartridges from the carriage. Push in the tab on each cartridge and lift them out.
CAUTION: Don’t leave cartridges outside the printer for more than 30 minutes; it can damage both printer and cartridges.
- Lift the latch on the carriage until it stops.
- Grip the printhead by its sides and remove it from the carriage.
- Dampen a lint-free cloth with distilled or bottled water. Wipe the electrical contacts from bottom to top until no ink appears on the cloth. Avoid touching copper-colored contacts with fingers or letting them touch surfaces.
CAUTION: Don’t touch the contacts with fingers.
- With a clean area of the damp cloth, wipe away any ink and debris from the edge between nozzles and contacts.
- Using a clean area of the damp cloth, wipe ramps on both sides of ink nozzles, away from nozzles only.
- Wipe each area with a clean, dry, lint-free cloth.
- With a clean area of the damp cloth, wipe contacts in the carriage from top to bottom until no ink appears on the cloth.
- Wipe contacts with a clean, dry, lint-free cloth.
- Slide the printhead back into the carriage and lower the latch until it stops.
- Reinsert each cartridge into its color-coded slot, ensuring they snap into place and none protrude.
- Close the door or lid to the cartridge area.
If the error persists, the issue may persist after inserting the printhead. Repeat the steps to reseat the printhead up to three times, then proceed if the error still appears.
To fix errors like Incompatible printhead, Missing or failed printhead, and Printhead problems for printers using cartridges:
932, 933, 950, 951, 952, 953, 962, and 963.
Follow these steps in order. Test the printer after each step to check if the issue is resolved.
Part 1. Reset the Printer.
Reset the printer to recover from errors or failures.
If your printer has a rechargeable battery, take it out.
- Press the power button to turn off the printer. If it doesn’t turn off, disconnect the power cord.
- Unplug the power cord from the power source.
- Wait for 60 seconds.
- Connect the power cord directly to a wall outlet and to the printer.
- Switch on the printer to complete the reset.
Part 2. Reseating the Printhead if Replaceable
If your printer’s printhead is removable, you can manually reseat it. Otherwise, follow these steps to replace the printhead.
- Open the door or lid to access the cartridges. Wait until the carriage stops moving before proceeding.
- Check if there’s a latch on the carriage.
- If the printhead does not latch, it cannot be replaced.
- If there’s a latch, continue to the next step.
- With the printer turned on, disconnect the power cord.
- Lift the carriage latch, slightly lift the printhead, lower it back into the carriage, wiggle it left and right, then lower the carriage latch until it stops.
- Close the door or lid to the cartridge area.
- Reconnect the power cord.
If the error persists, the issue may persist after inserting the printhead. Repeat the steps to reseat the printhead up to three times, then proceed if the error still appears.
By following these steps, you should be able to overcome the “Printhead problem” error. If these steps do not resolve the issue, please get back to Smart Ink customer service for additional help.


