Have you ever had a situation when you needed to print an important document, a letter, or homework for your kids, but your printer has stopped working? Or is it now streaking with no evident issues?
We know how annoying and discouraging this may feel. If the electricity works well and your printer was still fine yesterday, there is a chance that the main issue is clogged print heads.
So today, we’ll teach you how to clean the printheads of your printer fast and efficiently and prevent this situation in the future.
Where to start
Whatever happens to your printer, the first thing you should do is look through the user manual. It may be trivial advice, we know, but it can answer many questions and help you solve some problems. So open that manual right away and find a chapter about a clogged print head!
Yet, if you don’t have a manual or if you don’t feel like searching for it, there are some general steps that you may take regardless of your printer model.
How to clean print heads
First off, let’s deal with basic notions 😉
A print head is a specific detail of your printer that helps transfer ink from the cartridges onto the page. It basically fires tiny droplets of ink via numerous printer nozzles to create the desired print. When one of these nozzles gets clogged, your printouts may look a bit faded or streaky.
There are two types of print heads: built in the printer and built into the cartridge. And the cleaning method depends on the one used in your printer model.
When it comes to the print heads built into the cartridge, there is no need to clean them manually. Every time you replace inks, you are also replacing print heads, which usually solves your print quality problem.
Automatic print head cleaning
The easiest and fastest way to resolve this print quality issue for both printhead types is automatic print head cleaning, which is available for most printer models.
The cleaning function is included in the software of almost every printer. Usually, you can find it under the “printer maintenance” section of your printer’s display menu.
Automatic print head cleaning usually takes only one or two minutes, so you won’t need to wait for too long.
Once everything is done, print out a test page to compare print quality. If you are happy with the result, you can continue printing. If you are still not fully satisfied with the colors, you may have to run the printhead cleaning 2-4 more times before print quality is reestablished. If this doesn’t work, you might have to manually clean a printhead.
Manual print head cleaning
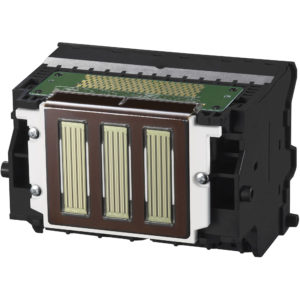
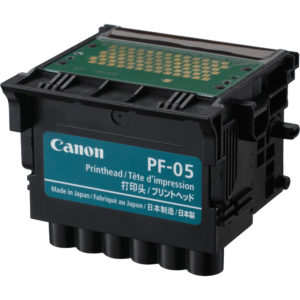
Now, let’s see how to clean printheads built in the printer. There are two types of them, removable and non-removable, and we’ll dwell upon both.
First, to clean a printhead – you need to find a printhead. Don’t worry, they are not gonna hide from you 🙂
This is what they usually look like in different printer models:
It is not very hard to clean a print head manually, and we are sure that you can do it on your own. We’ve prepared probably the easiest way to clean print heads at home, so let’s go!
Let us get ready with everything we’ll need in the process. For the manual cleaning, you should have one plastic container, some paper towels or napkins, a lint-free cloth, gloves, a syringe for washing, and filtered or distilled hot water.
Here is a guide on how to clean the printhead that is built into the printer and can’t be removed from it:
- Turn on the printer and open the cover. Remove your ink cartridges and leave all slots empty. We will get back to them soon.
- Switch the device off and disconnect the power cord from the printer.
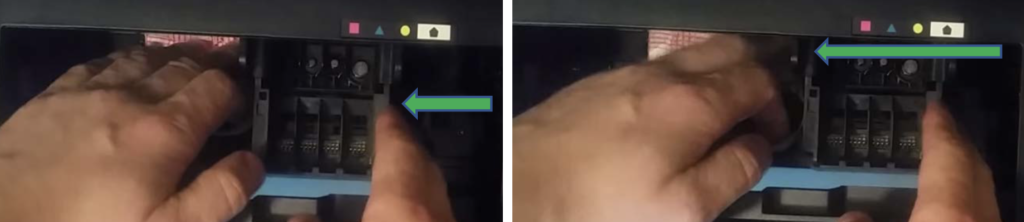
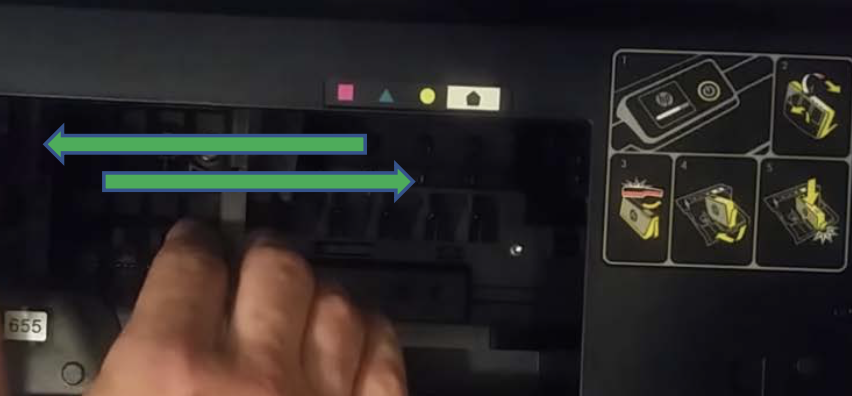
- Take two napkins, put them under the print head and gently move the printhead to the side with another hand. As a result, the napkin should be under the print head.
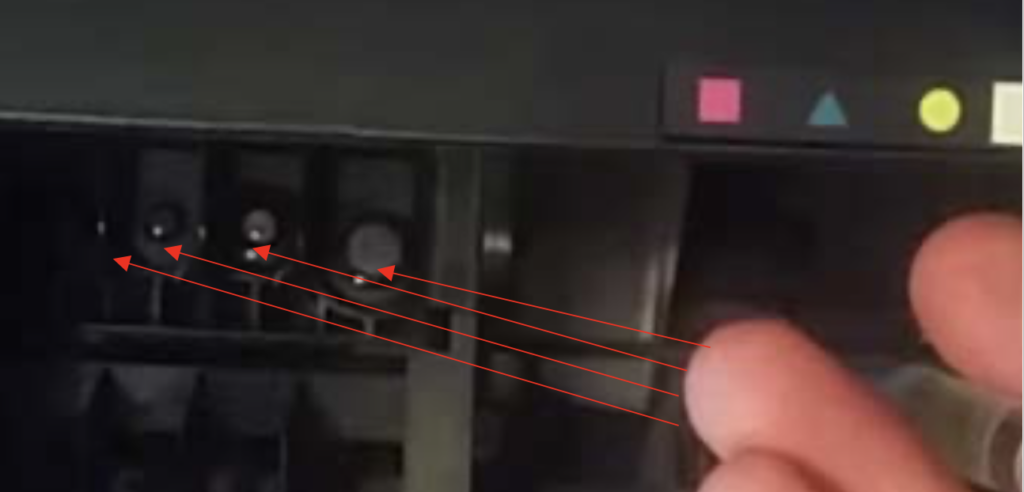
- Next, you’ll need a medical syringe. Dial a bit of warm water into it and put some liquid on the printhead nozzles. Point the needle into the center of the injector and gently press on the plunger of the syringe until several drops appear on top of each injector.
Note that drops of liquid will immediately be painted in matching color. This is totally normal because the print head nozzles contain remnants of ink.
- Put some liquid directly on a napkin. Now, hold the napkin with one hand and smoothly move the print head from side to side. Then, gently return the print head to its original position and remove the napkin.
- Take a napkin and return the print head to its original position. Install the cartridges into corresponding slots, turn on the device, and perform additional automatic print head cleaning with your printer menu buttons.
Here’s a step-by-step guide on how to clean print heads if you can remove them from your printer:
- Take a dry paper towel, fold it into quarters, and place it in the plastic container.
- Pour about two inches of hot water into the container so that the paper towel is completely submerged.
- Open up your printer and manually take out all of the ink cartridges.
- Leave the cartridges aside on a separate paper towel and go on with the print head cleaning process. Make sure that the cartridges are facing up on the paper towel so that they don’t leak accidentally.
- Find a gray latch behind the carriage that holds the cartridges. Lift it up gently since this will release the print head from the printer.
- Pull the print head up and out to remove it from the machine.
- Dampen the lint-free cloth with hot water.
- Gently wipe away any excess ink on the print head nozzle.
- Place the printhead in the container with the paper towels. The nozzle should be facing down. Be careful not to touch the nozzle as it can be damaged easily.
- Let the print head soak for about ten minutes. After this, remove it from the container and let it rest on a dry paper towel to dry for fifteen minutes. The nozzle should be facing up.
- Reinstall the print head back into the printer. Don’t forget to secure the latch. Then reinstall the cartridges and run the cleaning function on the machine again.
It may seem quite complicated at first sight, but in fact, it is not so difficult. If our step-by-step print head cleaning solution looks a bit intimidating, you may watch the video to see for yourself that it’s not a big deal.
Removable:
Non-removable:
We hope that our short guide and these video instructions will allow you to unclog a print head at home and enjoy high-quality printouts again.
What else you may do
Unfortunately, there are some cases when neither automatic, not manual cleaning helps. In this case, you might need to replace the print head, which can be a bit expensive. We advise you to turn to the qualified service for full printer inspection and advice.
At Smart Ink, we believe that it’s easier to prevent some situations rather than try to fix them. That’s why we highly recommend you to take good care of your printer, use it regularly, and clean from time to time if it doesn’t have the automatic cleaning option.
Final advice
We’ve prepared this article to protect you from extra headache and guide you through the whole print head cleaning process. Hope, you’ll find it useful!
If you are not sure what to do or still have any questions, you can easily turn for help to our Customer Care team! We work 24/7 and are always happy to help you if you need advice about printhead cleaning or any other printing issue. You may rely on our experience and years devoted to this industry 🙂
So don’t think hard, think smart with Smart Ink!